So I decided to use Apple’s Screen Time API to block apps that you choose for a specified time, and of course to add an extra touch I made a custom shield view using the shield configuration app extension. I will be showing the steps to use the API and give a better understanding of how it works. But first what is Screen Time API?
What is Screen Time API?
It basically provides a series of features that allows for parental controls such as allowing parents to add restrictions to apps and websites to their child’s device, enabling parents to set time limits on their child’s usage of the device, and sharing usage of the child’s device with parents.
It’s composed of 3 frameworks:
Set restrictions on device and keep them in place like:
- Preventing password change
- Provide web content filtering
- Shield apps and websites
Authorize your app to provide parental controls on a device.
- Authorizes access to Screen Time Api
- Prevents removal and circumvention
- Privacy preserving tokens for apps used by your family
Device Activity provides a privacy-preserving way for an application to monitor a user’s application and website activity. For instance, you can set up a bedtime schedule that monitors device activity while the user is supposed to be asleep. Your app extension can receive warnings before an activity’s schedule starts or ends, or when an activity is about to reach a predefined threshold. You can monitor the time spent on websites and apps to warn the user once they have reached their threshold. Runs code without launching your app.
- Executes code on start and end of device activity schedules
- Executes code on usage threshold
- Custom usage reports using SwiftUI
- New extension point allow you to choose what data to show
Prerequisites
- I’ll be using screen time api to control the individual, that only works on iOS 16.0
- Add the Family Controls entitlement in the Signing & Capabilities section of the main app target
Note: Family Controls is a privileged entitlement, meaning you must request permission from Apple in order to publish apps on TestFlight or the App Store that use it.
Now lets code
The first important step is to ask the user for authorization to use the api.
import SwiftUI
import FamilyControls

@main
struct ScreenTimeApp: App {

    let center = AuthorizationCenter.shared

    var body: some Scene {
        WindowGroup {
            ContentView()
                .task {
                    do {
                        try await center.requestAuthorization(for: .individual)
                    } catch {
                        print("Failed to get authorization: \(error)")
                    }
                }
        }
    }
}
Then we will create a ShieldManager swift file where we will handle the actual shielding of the apps utilizing the ManagedSettingsStore class.
import SwiftUI
import FamilyControls
import ManagedSettings

class ShieldManager: ObservableObject {
    @Published var discouragedSelections = FamilyActivitySelection()

    private let store = ManagedSettingsStore()

    func shieldActivities() {
        // Clear to reset previous settings
        store.clearAllSettings()

        let applications = discouragedSelections.applicationTokens
        let categories = discouragedSelections.categoryTokens

        store.shield.applications = applications.isEmpty ? nil : applications
        store.shield.applicationCategories = categories.isEmpty ? nil : .specific(categories)
        store.shield.webDomainCategories = categories.isEmpty ? nil : .specific(categories)
    }
}
Now in another view, we will ask the user to select what apps he wants to apply the shielding.
import SwiftUI
import FamilyControls

struct ShieldView: View {

    @StateObject private var manager = ShieldManager()
    @State private var showActivityPicker = false

    var body: some View {
        VStack {
            Button {
                showActivityPicker = true
            } label: {
                Label("Configure activities", systemImage: "gearshape")
            }
            .buttonStyle(.borderedProminent)
            Button("Apply Shielding") {
                manager.shieldActivities()
            }
            .buttonStyle(.bordered)
        }
        .familyActivityPicker(isPresented: $showActivityPicker, selection: $manager.discouragedSelections)
    }
}
SwiftUI also provides a FamilyActivityPicker view, if you decide to use the view approach.
First test
For the moment, we can only apply the shield to the activities that we select. The unlock functionality will be added in the next step. But first let’s test the current code on a real device because from personal experience Screen Time API doesn’t work well in a simulator.
So after allowing the api, I’ll be able to configure the activities that I want to apply the shielding. For the moment I’ll just select Instagram. As you can see, the app icon will become slightly dimmed and there will be a hourglass indicating it’s a shielded app.
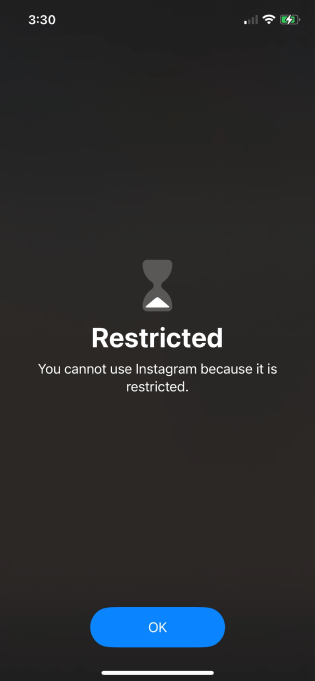
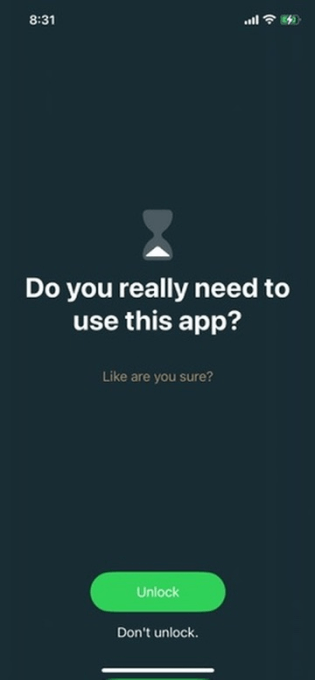
If the user decides to open the app, they won’t actually be able to use it and be greeted with the following view.
Now in the next step we will add the custom functionality to allow the user to unlock the app and use it for a few minutes then shield it again once the timer has finished. We will also add a custom view for the shielded view.
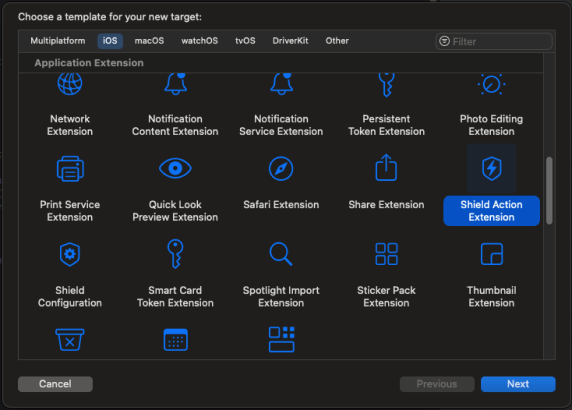
Add app extensions.
App extensions let you extend custom functionality and content beyond your app and make it available to users while they’re interacting with other apps or the system. For the following project well be working the following ones:
- Shield Action Extension
- Shield Configuration
- Device Activity Monitor
Add the first one by going to File > New > Target > Shield Action Extension. Repeat the same steps for other extensions.
Optional step: It might ask you to activate the scheme. If it does, activate it. Then edit the created scheme > go to Run tab > Info > Executable > select the projects executable that ends in .app. Do the same step for each of the added scheme. This allows you to run the apps extension and receive print statements in the Xcode console.
Share data between extensions
Before adding custom functionalities on the extensions, we will need to share some information between them. We first need to go to the projects target and add a capability called App Groups. The group key needs to be in the following format: group.com.{organization name}.{project name}.{group key name}, for example my would be: group.com.pedro.ScreenTimeApp.data. Then add the same capability in the Shield Action and Device Activity Monitor Target. This will allow us to use the same data across multiples extensions.
Create a new swift file called ApplicationProfile and add the following code:
**import Foundation
import ManagedSettings

struct ApplicationProfile: Codable, Hashable {
    let id: UUID
    let applicationToken: ApplicationToken

    init(id: UUID = UUID(), applicationToken: ApplicationToken) {
        self.applicationToken = applicationToken
        self.id = id
    }
}**
Then a another swift called DataBase, where we will store the application profiles. Now ideally you would want to work with core data, but for this demonstration purpose I am using UserDefaults.
import Foundation

struct DataBase {
    private let defaults = UserDefaults(suiteName: "group.com.pedro.ScreenTimeApp.data")
    private let applicationProfileKey = "ApplicationProfile"

    func getApplicationProfiles() -> [UUID: ApplicationProfile] {
        guard let data = defaults?.data(forKey: applicationProfileKey) else { return [:] }
        guard let decoded = try? JSONDecoder().decode([UUID: ApplicationProfile].self, from: data) else { return [:] }
        return decoded
    }

    func getApplicationProfile(id: UUID) -> ApplicationProfile? {
        return getApplicationProfiles()[id]
    }

    func addApplicationProfile(_ application: ApplicationProfile) {
        var applications = getApplicationProfiles()
        applications.updateValue(application, forKey: application.id)
        saveApplicationProfiles(applications)
    }

    func saveApplicationProfiles(_ applications: [UUID: ApplicationProfile]) {
        guard let encoded = try? JSONEncoder().encode(applications) else { return }
        defaults?.set(encoded, forKey: applicationProfileKey)
    }

    func removeApplicationProfile(_ application: ApplicationProfile) {
        var applications = getApplicationProfiles()
        applications.removeValue(forKey: application.id)
        saveApplicationProfiles(applications)
    }
}
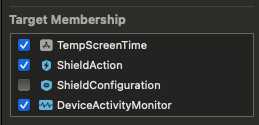
Important Step❗️For both of these new swift files, select the target membership for shield action and device activity monitor
Shield Configuration Extension
Inside the shield configuration extension file we can see that we can customize the shielding view for an Application or WebDomain using the ShieldConfiguration struct which might be a little limiting, but It’s apples way of keeping things consistent. I’ll be configuring just for the application, but feel free to do your own implementations.
override func configuration(shielding application: Application) -> ShieldConfiguration {
        // Customize the shield as needed for applications.
        ShieldConfiguration(
            backgroundColor: .systemCyan,
            title: ShieldConfiguration.Label(text: "Do you really need to use this app?", color: .label),
            subtitle: ShieldConfiguration.Label(text: "Like are you sure?", color: .systemBrown),
            primaryButtonLabel: ShieldConfiguration.Label(text: "Unlock", color: .label),
            primaryButtonBackgroundColor: .systemGreen,
            secondaryButtonLabel: ShieldConfiguration.Label(text: "Don't unlock.", color: .label)
        )
    }
Shield Action Extension
In this extensions is where we handle the actions of the buttons pressed in the shield view. Using the completionHandler we decide if we want to close the app or defer to update the UI.
For this project I’ll be handling the actions for Application
import ManagedSettings
import DeviceActivity
import Foundation

// Override the functions below to customize the shield actions used in various situations.
// The system provides a default response for any functions that your subclass doesn't override.
// Make sure that your class name matches the NSExtensionPrincipalClass in your Info.plist.
class ShieldActionExtension: ShieldActionDelegate {

    var applicationProfile: ApplicationProfile!

    override func handle(action: ShieldAction, for application: ApplicationToken, completionHandler: @escaping (ShieldActionResponse) -> Void) {
        // Handle the action as needed.
        switch action {
        case .primaryButtonPressed:
            createApplicationProfile(for: application)
            startMonitoring()
            unlockApp()
            completionHandler(.close)
        case .secondaryButtonPressed:
            completionHandler(.defer)
        @unknown default:
            fatalError()
        }
    }

    override func handle(action: ShieldAction, for webDomain: WebDomainToken, completionHandler: @escaping (ShieldActionResponse) -> Void) {
        // Handle the action as needed.
        completionHandler(.close)
    }

    override func handle(action: ShieldAction, for category: ActivityCategoryToken, completionHandler: @escaping (ShieldActionResponse) -> Void) {
        // Handle the action as needed.
        completionHandler(.close)
    }

    func createApplicationProfile(for application: ApplicationToken) {
        applicationProfile = ApplicationProfile(applicationToken: application)
        let dataBase = DataBase()
        dataBase.addApplicationProfile(applicationProfile)
    }

		// Start a device activity for this particular application
    func startMonitoring() {
        let unlockTime = 2
        let event: [DeviceActivityEvent.Name: DeviceActivityEvent] = [
            DeviceActivityEvent.Name(applicationProfile.id.uuidString) : DeviceActivityEvent(
                applications: Set<ApplicationToken>([applicationProfile.applicationToken]),
                threshold: DateComponents(minute: unlockTime)
            )
        ]

        let intervalEnd = Calendar.current.dateComponents(
            [.hour, .minute, .second],
            from: Calendar.current.date(byAdding: .minute, value: unlockTime, to: Date.now) ?? Date.now
        )
        let schedule = DeviceActivitySchedule(
            intervalStart: DateComponents(hour: 0, minute: 0),
            intervalEnd: intervalEnd,
            repeats: false
        )

        let center = DeviceActivityCenter()
        do {
            try center.startMonitoring(DeviceActivityName(applicationProfile.id.uuidString), during: schedule, events: event)
        } catch {
            print("Error monitoring schedule: \(error)")
        }
    }

		// remove the shield of this application
    func unlockApp() {
        let store = ManagedSettingsStore()
        store.shield.applications?.remove(applicationProfile.applicationToken)
    }
}
Device Activity Monitor Extension
This is where we handle all the activities that we added to be monitored. There are a series of methods we can override, but all we need use is the intervalDidEnd method.
import DeviceActivity
import Foundation
import ManagedSettings

// Optionally override any of the functions below.
// Make sure that your class name matches the NSExtensionPrincipalClass in your Info.plist.
class DeviceActivityMonitorExtension: DeviceActivityMonitor {
    override func intervalDidEnd(for activity: DeviceActivityName) {
        super.intervalDidEnd(for: activity)
        // Handle the end of the interval.
        let database = DataBase()
        guard let activityId = UUID(uuidString: activity.rawValue) else { return }
        guard let application = database.getApplicationProfile(id: activityId) else { return }
        let store = ManagedSettingsStore()
        store.shield.applications?.insert(application.applicationToken)
        database.removeApplicationProfile(application)
    }
}
Conclusion
And there you go, you may run the app again. Once you open a shielded app you’ll see the custom shield view and once unlocking the app you’ll be able to use it for 2 minutes or another time that you may have specified. This is just one of the ways you can use screen time api, but there are still plenty of other options, it will all depend on what you’re trying to achieve. I hope this could help you.